This part discusses the Chrono FEA module.
Finite elements can be used in Chrono to model flexible parts.
Different types of finite elements are supported:
- solid volume (e.g. tetrahedrons): can be used to model parts with arbitrary geometry, such as metal shapes, plastic molds, biomechanical tissues like muscles, etc.
- surface volume i.e. shells: can be used to model thin parts, like tires, airbags, etc.
- beam elements: can be used to model cables, wires, thin shafts, blades of wind turbines, etc.
Large displacements are supported for the majority of the finite elements. This allows, for instance, the simulation of problems like rubber structures undergoing large deflections, airplane taking complex maneuvers in space, blades of wind turbines with large rotations and other geometric non-linearities. Of course linearized small-displacement analysis is supported too, as a subcase.
Detailed documentation on nodes and elements can be found in these pages:
Finite element data structures
Data structures for a FEA model are organized in this way:
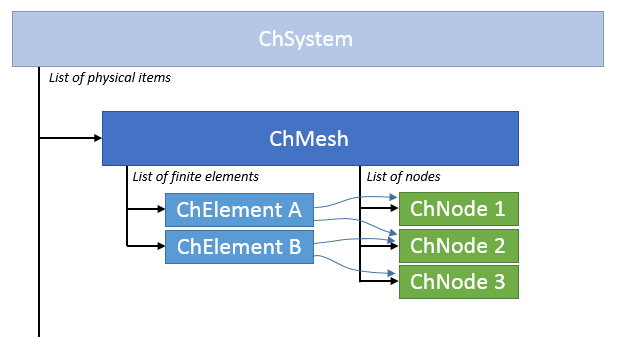
Any Chrono ChSystem holds, among lists of bodies, links, loads and other physic items, also a list of fea::ChMesh objects. These objects are themselves containers for finite elements (derived from ChElementBase) and nodes (derived from ChNodeFEAbase).
A single fea::ChMesh can actually contain multiple elements.
A full set of loads and links are available to apply loads and link nodes (either to other nodes or to ChBody).
How to create a FEA model
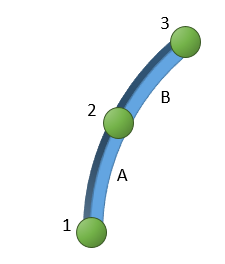
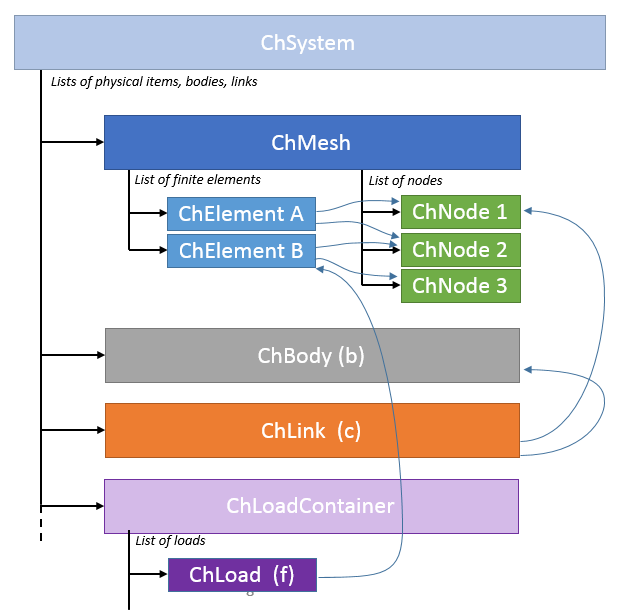
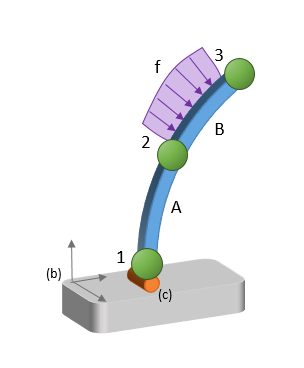
In the following example we show the data structures for a case with two elements, a constraint, a load:
In general:
- a mesh is a container for nodes and elements
- add a ChMesh to the system using ChSystem::Add()
- multiple meshes are allowed in a single system
- a node has degrees of freedom (xyz, rotations, etc.).
- add nodes to a mesh using ChMesh::AddNode()
- look at the list of nodes.
- an element connects N nodes.
- add elements to a mesh using ChMesh::AddElement()
- initialize the elements by telling which node are connected with
SetNodes() - set a material property to the element by using
SetMaterial() - look at the list of elements.
The following example illustrates it.
1) Create a ChMesh
- create the mesh (do this using
chrono_types::make_shared, so it will be handled by a shared pointer, and you will not worry about deleting it) - add the mesh to a physical system:
2) Create some nodes
- create nodes
- note: usually node positions are offered as parameters in their constructors
- add nodes to the mesh
- set node properties, if needed:
- e.g. most node classes provide a way to apply a local force (or even a torque if they have rotational DOFs) by using
SetForce(), an easier alternative to using ChLoad classes, if the force is constant. See loads for additional info. - it is possible to attach an optional local point-mass using
SetMass()for the nodes; otherwise the default mass for FEA nodes is zero as mass is mostly added by finite elements.
- e.g. most node classes provide a way to apply a local force (or even a torque if they have rotational DOFs) by using
3) Create a material
- create the material
- note that not all elements need a material, for instance ChElementSpring has no material.
- a single material can be shared between multiple elements.
4) Create FEA elements
- create the elements
- add the elements to the mesh.
- assign nodes (which you created before) to the element.
- assign material(s) to the elements.
See also
- whitepapers page Theory and additional information regarding the implementation of finite elements in Chrono
- tutorials Demos and examples
- API documentation The C++ classes and functions of this module.