Table of Contents
The Chrono source code can be obtained from the Chrono GitHub repository as zip files (for the current development branch or one of the official releases). Alternatively, you can use git to clone the Chrono repository.
Prerequisites
Building Chrono from sources requires a C++ compiler (which supports at least the C++17 standard) and the CMake build system.
Recommended compilers
- Windows: MSVC Visual Studio 2022 or newer. (VS 2022 Community Edition free download)
Note: the C++ compiler is not installed by default; make sure to install the C++ toolchain during VS setup. - Linux: GNU C++ compiler for Linux-based platforms (version 11 or newer)
- Linux: LLVM Clang C and C++ compiler (version 14 or newer)
- MacOS: Clang through Xcode Package. (Xcode free download)
Other compilers were also tested (e.g. Intel C++, PGI) but they are not officially supported and maintained. While it is likely possible to build Chrono with other toolchains, this might require changes to the CMake scripts.
Install CMake
CMake is required to configure the build toolchain before compiling Chrono.
CMake will configure and create the necessary solution files (Windows) or make files (Linux) necessary to compile and build Chrono from sources.
For Windows users: make sure to put the CMake executable in your Path environmental variable (the installer can do this for you).
On Linux, if not already installed, use the package manager to install cmake. Some distributions may need to install additional packages along with cmake (e.g., cmake-gui for the window-based CMake GUI interface or cmake-curses-gui to use the ccmake terminal-based GUI for CMake).
For Xcode users: while the CMake.app bundle also contains command line tools, you must set appropriate links to use it from the terminal. It is better to install a pure command line version via homebrew: brew install cmake in the terminal.
Install a GUI git client
While git can be used through command line we recommend using a GUI git client.
On Windows and MacOS, we suggest SourceTree, also used for illustration below.
Note that most modern IDEs have git integration (e.g. the free Visual Studio Code available on Windows, Linux, and Mac).
Optional support
During CMake configuration, Chrono also checks availability of additional support in terms of compiler capabilities (e.g., SIMD-level support, OpenMP availability) and environments (e.g., availability of MPI and GPU toolchains). If any of these is not found, specific optimizations in building Chrono and some modules is disabled (e.g., no multi-threaded support in FEA, Bullet collision, and Eigen if the C++ compiler is not OpenMP capable), some features are disabled (e.g., no multi-core collision detection algorithm if OpenMP or Thrust), or entire modules are disabled (e.g., Chrono::FSI-SPH and Chrono::DEM require a GPU backend (CUDA or HIP); Chrono::Sensor ray-tracing paths require CUDA and NVIDIA OptiX; Chrono::Multicore cannot be built without OpenMP and Thrust; Chrono::Synchrono and the Chrono::Vehicle co-simulation module cannot be built without MPI).
Additional support is checked if enabling specific Chrono modules. For example, a Fortran compiler is required to enable the Chrono::MUMPS module.
GPU accelerator support
Chrono now supports both NVIDIA and AMD GPUs (via CUDA and HIP, respectively). Use of GPU acceleration is required for the GPU-based Chrono modules (Chrono::FSI-SPH and Chrono::DEM). Note that the ray-tracing sensor models in Chrono::Sensor rely on the OptiX library and, as such, can only used with CUDA and an NVIDIA GPU.
The target GPU backend can be set via the CMake variable CHRONO_GPU_BACKEND, which can be one of AUTO, CUDA, or HIP. By default, this variable is initially set to AUTO which will trigger a search for a supported GPU. If AMD HIP or NVIDIA CUDA are found, CHRONO_GPU_BACKEND is set to the resolved GPU backend architecture (CUDA or HIP).
CUDA support
Chrono can be configured and built with CUDA versions newer than 12.3. Consult the NVIDIA website for instructions on installing CUDA and the necessary NVIDIA drivers for your machine and operating system.
If using a CMake version newer than 3.23, the Chrono configuration sets the CUDA architectures to all-major (this can be changed to native or any other specific architecture). For older CMake versions, it is the user's responsibility to properly set CHRONO_CUDA_ARCHITECTURES to a value appropriate for their GPU card (note that a compute capability of "8.9" must be entered as 89).
For users with multiple side-by-side CUDA installations, the desired version can be selected by specifying the appropriate toolchain in CMake (e.g., -T cuda=C:\Program Files\NVIDIA GPU Computing Toolkit\CUDA\v12.8). On Linux, multiple CUDA environments can also be managed using environment modules (see for example this GitHub Gist).
HIP support
The minimum HIP version required by Chrono is 5.7.0.
Install the AMD ROCm stack for your distribution so that hipcc and the HIP runtime are available. Set CHRONO_GPU_BACKEND=HIP during CMake configuration (or use AUTO on a machine where ROCm is detected before CUDA). Set CHRONO_HIP_ARCHITECTURES to your GPU ISA (for example gfx942 on AMD Instinct MI300-class accelerators, or gfx90a on MI200-class); alternatively set CMAKE_HIP_ARCHITECTURES as appropriate for your CMake version.
The HIP backend can also be built natively on Windows using the AMD HIP SDK; see the Windows section of the repository guide ../../../docs/README_AMD_GPU.md "docs/README_AMD_GPU.md" for the required toolchain configuration.
For CPU-only PyChrono next to a ROCm PyTorch stack, you do not need the NVIDIA CUDA toolkit; see the repository guide ../../../docs/README_AMD_GPU.md "docs/README_AMD_GPU.md" (workflow summaries, Eigen3/SWIG notes, and ROCR_VISIBLE_DEVICES for multi-GPU hosts).
Thrust support
The Thrust library is used, with different back-ends, in various Chrono features and modules. For example, the multicore collision detection library (alternative to the default Bullet-based collision detection), as well as the Chrono::Multicore module require Thrust with the OpenMP back-end. The Chrono::FSI GPU solver uses Thrust with the CUDA back-end when CHRONO_GPU_BACKEND=CUDA, and with the HIP port (rocThrust) when CHRONO_GPU_BACKEND=HIP.
The easiest way to obtain the Thrust (headers-only) library is as part of a recent CUDA distribution. This allows using the latest Thrust version (e.g., 2.8.2 in CUDA 12.9.0). For **CHRONO_GPU_BACKEND=HIP**, the ROCm installation supplies rocThrust headers compatible with the HIP toolchain.
It is possible to use Thrust stand-alone (e.g., for use on machines without an NVIDIA GPU to enable the Chrono::Multicore module). However, that requires using an older version of Thrust from its GitHub repository. Note that the latest version available there is 2.1.0, but the latest version that works with Chrono without any modifications is 1.7.1.
MPI support
An MPI installation is necessary for Chrono::Synchrono and for the co-simulation framework available in Chrono::Vehicle (for vehicle-terrain interaction). Chrono has been successfully built with Intel MPI (also included in the Intel oneAPI HPC Toolkit, Microsoft MPI, OpenMPI, and MPICH).
OpenMP support
All recent versions of common compilers support OpenMP and as such it is likely that OpenMP support will be detected automatically during Chrono configuration. Even then, users are given the option to disable use of OpenMP (unselect the CH_ENABLE_OPENMP CMake option).
Note for Windows users: MSVC only supports the OpenMP 2.0 standard (see the Microsoft website for details). This is not a problem for use in Chrono, as only features already available in OpenMP 2.0 are used.
Third-party dependencies
The Chrono core module has a single dependency on the Eigen3 template library for linear algebra.
Since optional Chrono modules may bring in additional dependencies we recommend to enable only those that are required by your project, at least for the first installation; for their installation please refer to Installation Guides.
Install Eigen
Eigen is a headers-only library and as such it can be used immediately as downloaded. However, it can also be configured and installed with cmake (see below).
On Linux, Eigen is also available through the system package manager (e.g. sudo apt install eigen3-dev).
On the Mac, Eigen can be installed via homebrew: brew install eigen. Beginning with MacOS 12 Monterey, homebrew installs in /opt/homebrew.
Chrono supports both the latest Eigen3 version 5.0.0, as well as the previous 3.* versions (e.g., 3.3.9 and 3.4.1). For best compatibility with newer versions of other 3rd party packages, most notably Intel oneAPI, we recommend using the latest Eigen3 5.0.0.
Utility scripts for installing 3rd-party Chrono dependencies
The Chrono distribution includes, in the directory contrib/build-scripts a set of scripts that provide a simple mechanism for installing dependencies for the various Chrono modules. The scripts are organized iun sub-directories by OS: Bash shell scripts in contrib/build-scripts/linux/ and Windows batch scripts in contrib/build-scripts/windows/. The directory contrib/build-scripts/macOS/ contains Bash shell scripts tailored for the specifics of MacOS; if a script is not present in that directory, simply use the Linux script.
Notes
- the scripts assume that git, cmake, and a C++ compiler are available
- additional requirements (if any) are indicated in the comments at the top of each script
- usage instructions are listed in the comments at the top of each script
Currently, scripts are provided for the following packages:
- Eigen3 – the only external dependency of the core Chrono module
- GL and GLEW – OpenGL packages (optionally) used in Chrono::Sensor
- MUMPS – a direct sparse linear solver required by Chrono::Mumps
- OpenCRG – a file format for road description used (optionally) in Chrono::Vehicle
- Spectra – an algebra package required by Chrono::Modal
- URDF – URDF file parser utilities optionally used by Chrono::Parsers
- VDB – OpenVDB packages optionally used in Chrono::Sensor
- VSG – VulkanSceneGraph packages required by Chrono::VSG
In addition, each sub-directory includes a sample script for configuring and building Chrono with various modules enabled and satisfying the corresponding dependencies.
Usage
Consult the instructions in the comments at the top of each script. The general usage is as follows:
- copy the desired script(s) in a workspace directory (each script will create temporary directories to download the necessary sources and to configure and build the various packages)
- edit the script to tailor to your particular machine (at a minimum, set the desired installation directory)
- run the script
- verify that the package files were properly installed in the specified install directory
With the exception of OpenCRG, all packages built and installed by these scripts provide CMake configuration scripts which are used during CMake Chrono configuration to find the respective dependencies. To simplify the Chrono CMake configuration process and avoid manually specifying package-specific information every time, we recommend setting the CMAKE_PREFIX_PATH environment variable to add the directory containing the CMake project configuration scripts for each installed package. An example of CMAKE_PREFIX_PATH (on a Windows machine) is:
Notes on 3rd-party Chrono dependencies
- Never mix 64-bit and 32-bit binaries and libraries.
For example, you must link the 64-bit Irrlicht library. - Since many of the 3rd-party dependency packages create and install shared libraries, the following steps may be required:
- on Linux, run
ldconfig(you will likely need root permissions) to cache the necessary link to the newly created shared libraries or set theLD_LIBRARY_PATHenvironment variable - on Windows, add to the
PATHenvironment variable the directories containing the package DLLs (otherwise, these DLLs have to be manually copied next to the binaries so that they can be found at run-time)
- on Linux, run
Configuring Chrono with CMake
CMake can be used through a GUI interface, cmake-gui (note that on Linux, this requires installing a separate CMake package), from a Curses interface (ccmake), or else directly from the command prompt (cmake). Note that the latter requires passing all necessary CMake variables as arguments to cmake, or else write a script (example scripts are provided with the Chrono distribution, under the contrib/build-scripts/ directory).
Below, we describe in more details configuration of Chrono with cmake-gui and ccmake.
Using CMake through the GUI interface
Start cmake-gui to configure the build.
- In the field "Where is the source code" set the path to your Chrono directory.
This is the directory where you created your Git repository, in our example isC:/workspace/chrono. - In the field "Where to build the binaries" set the path to a directory different from the Chrono source location, as Chrono prohibits "in-source" builds. This build directory can be manually created beforehand; otherwise, CMake will ask to create it. For our example, let's use
C:/workspace/chrono_build

- Press the Configure button.
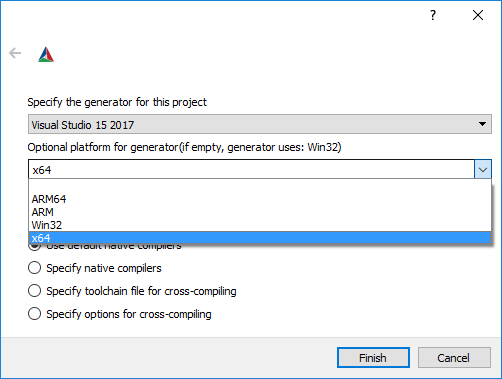
- Set the appropriate generator (e.g. Visual Studio, Makefile, etc.) and the appropriate platform (Win32, x64, etc.)
- Specify the location of the Eigen installation. If Eigen was itself configured and installed with CMake, set the CMake variable
Eigen3_DIRto point to the Eigen installation directory that contains a project configuration script (e.g.,C:/Packages/eigen/share/eigen3/cmake/). Otherwise, set the CMake variableEIGEN3_INCLUDE_DIRto point to the directory containing the subdirectoryEigenwith header files (e.g.,C:/Packages/eigen-3.4.0/. - Enable any additional module. Refer to their Installation Guides before proceeding any further.
- Remember that you might need to press Configure after you change some setting, even multiple times, until all variable dependencies are resolved.
- Finally, press Generate.
CMAKE_CONFIGURATION_TYPES to include all available configurations (Debug, Release, MinSizeRel, RelWithDebInfo). Leave that unchanged. If using a single-configuration generator (e.g., makefiles or ninja), set
CMAKE_CONFIGURATION_TYPES to the desired build type (e.g., Release or Debug). Do not leave it blank (default) as this will result in a build with no optimization and no debug information. CMake uses the slash
/ character for paths. Unix users are already used to this convention.Windows users should take care to convert the default separator
\ to /! At this point you just created a project that will be later used to build Chrono. You can close CMake.
Using CMake through the Curses interface
- Create a build directory different from the Chrono source directory (as Chrono prohibits "in-source" builds) and change your current directory to it.
- Run
ccmake <path-to-chrono-sources>from the build directory. A Curses-based GUI will appear in the terminal.

- Enter
cto Configure and continue. The interface will reload to a new screen with more options.
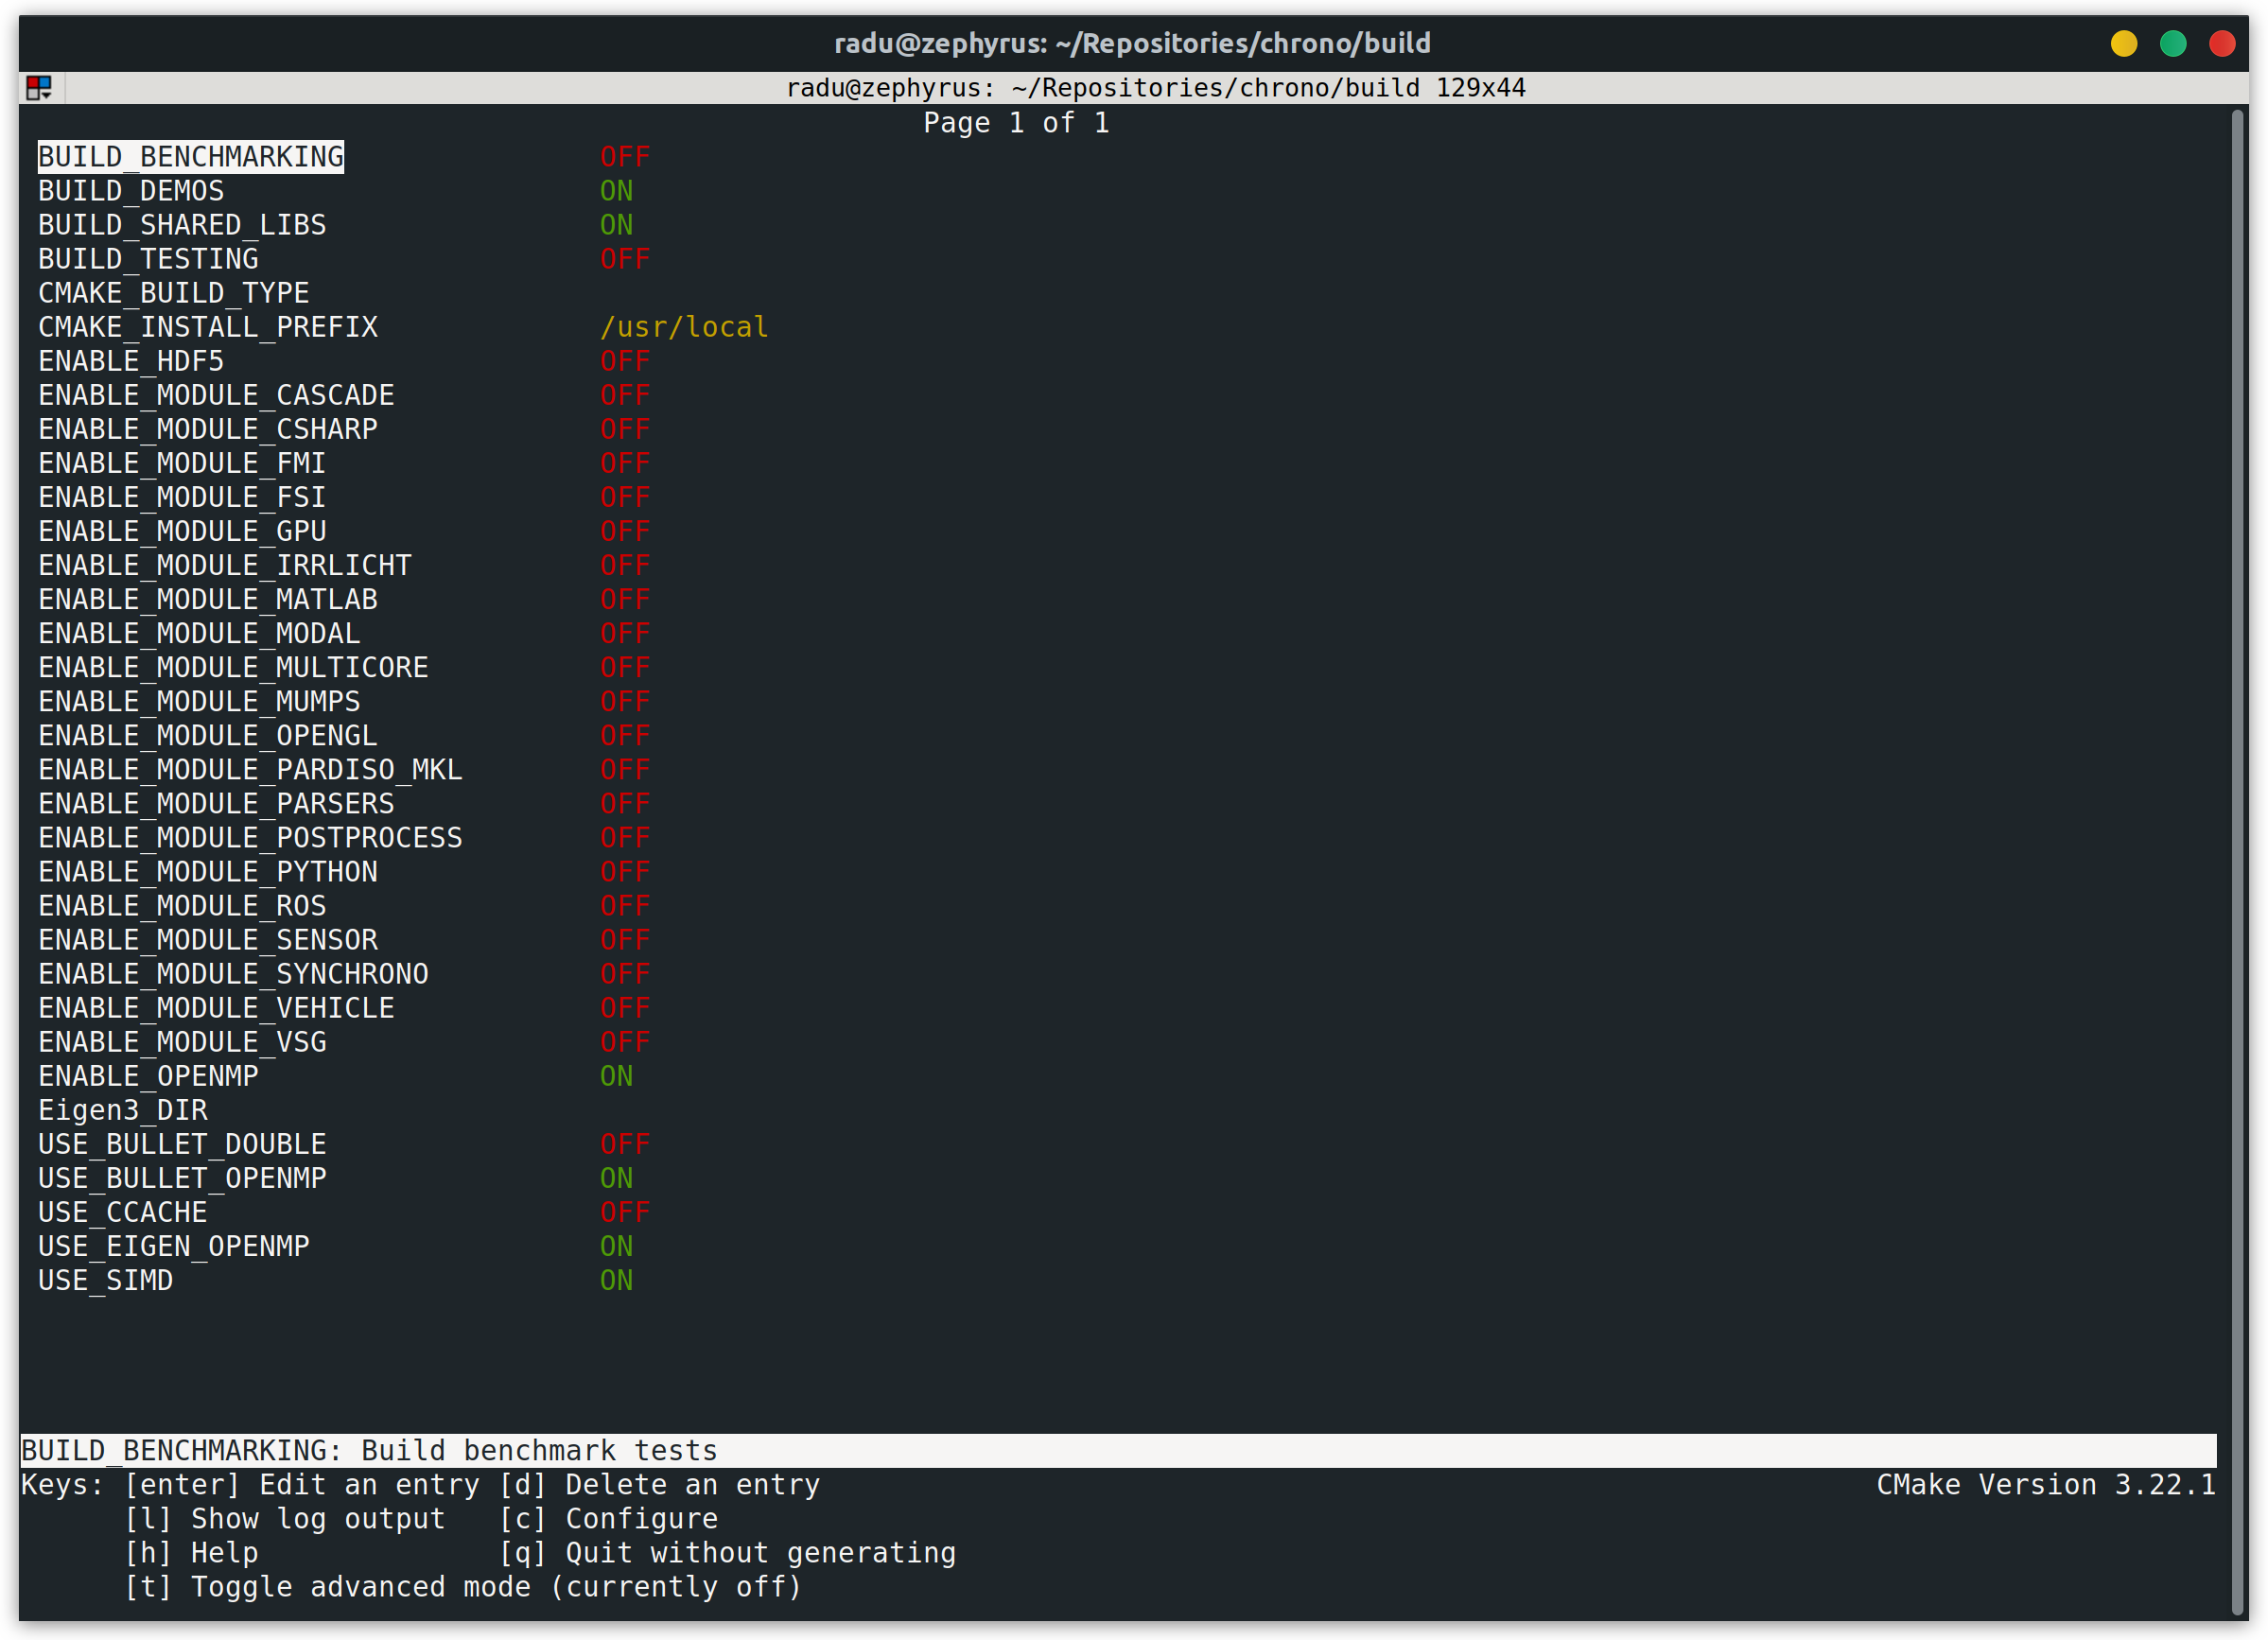
- Specify the build type (unless using a multi-config generator, see above).
- Specify the location of the Eigen installation (see above).
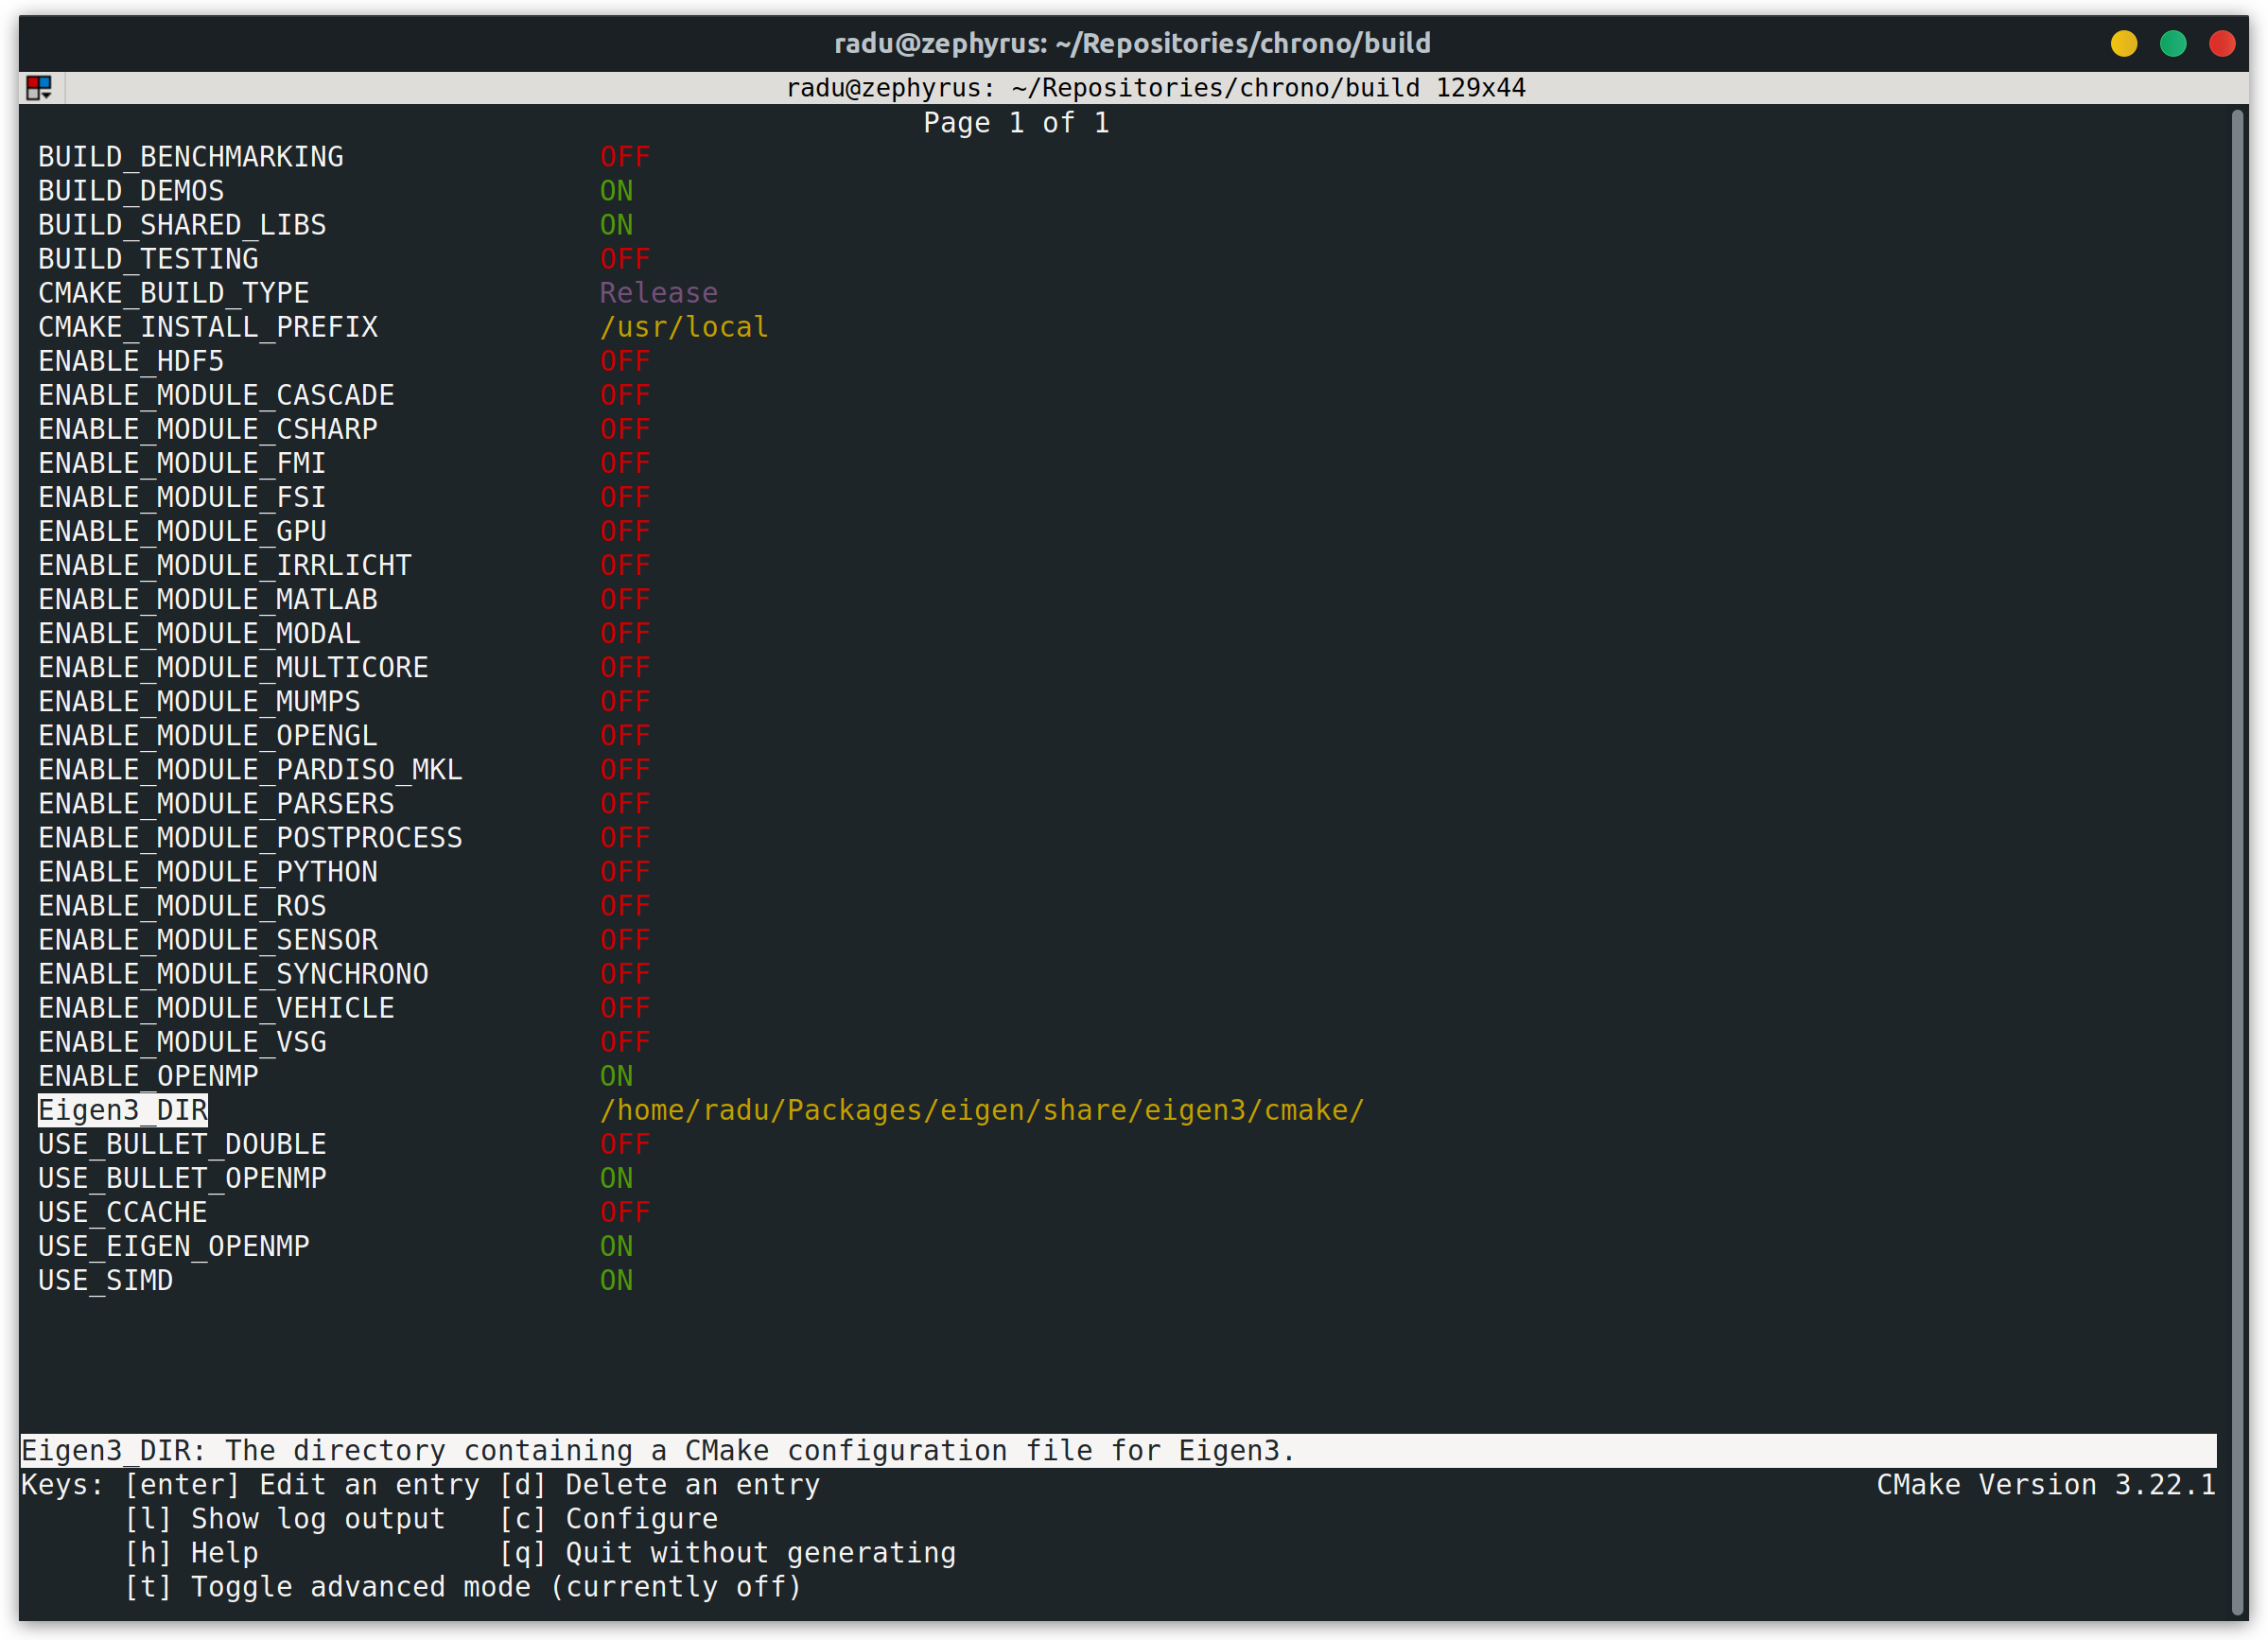
- Enter
cto Configure and continue until you reach the final screen. At which point entergto Generate, CCMake will close on completion.
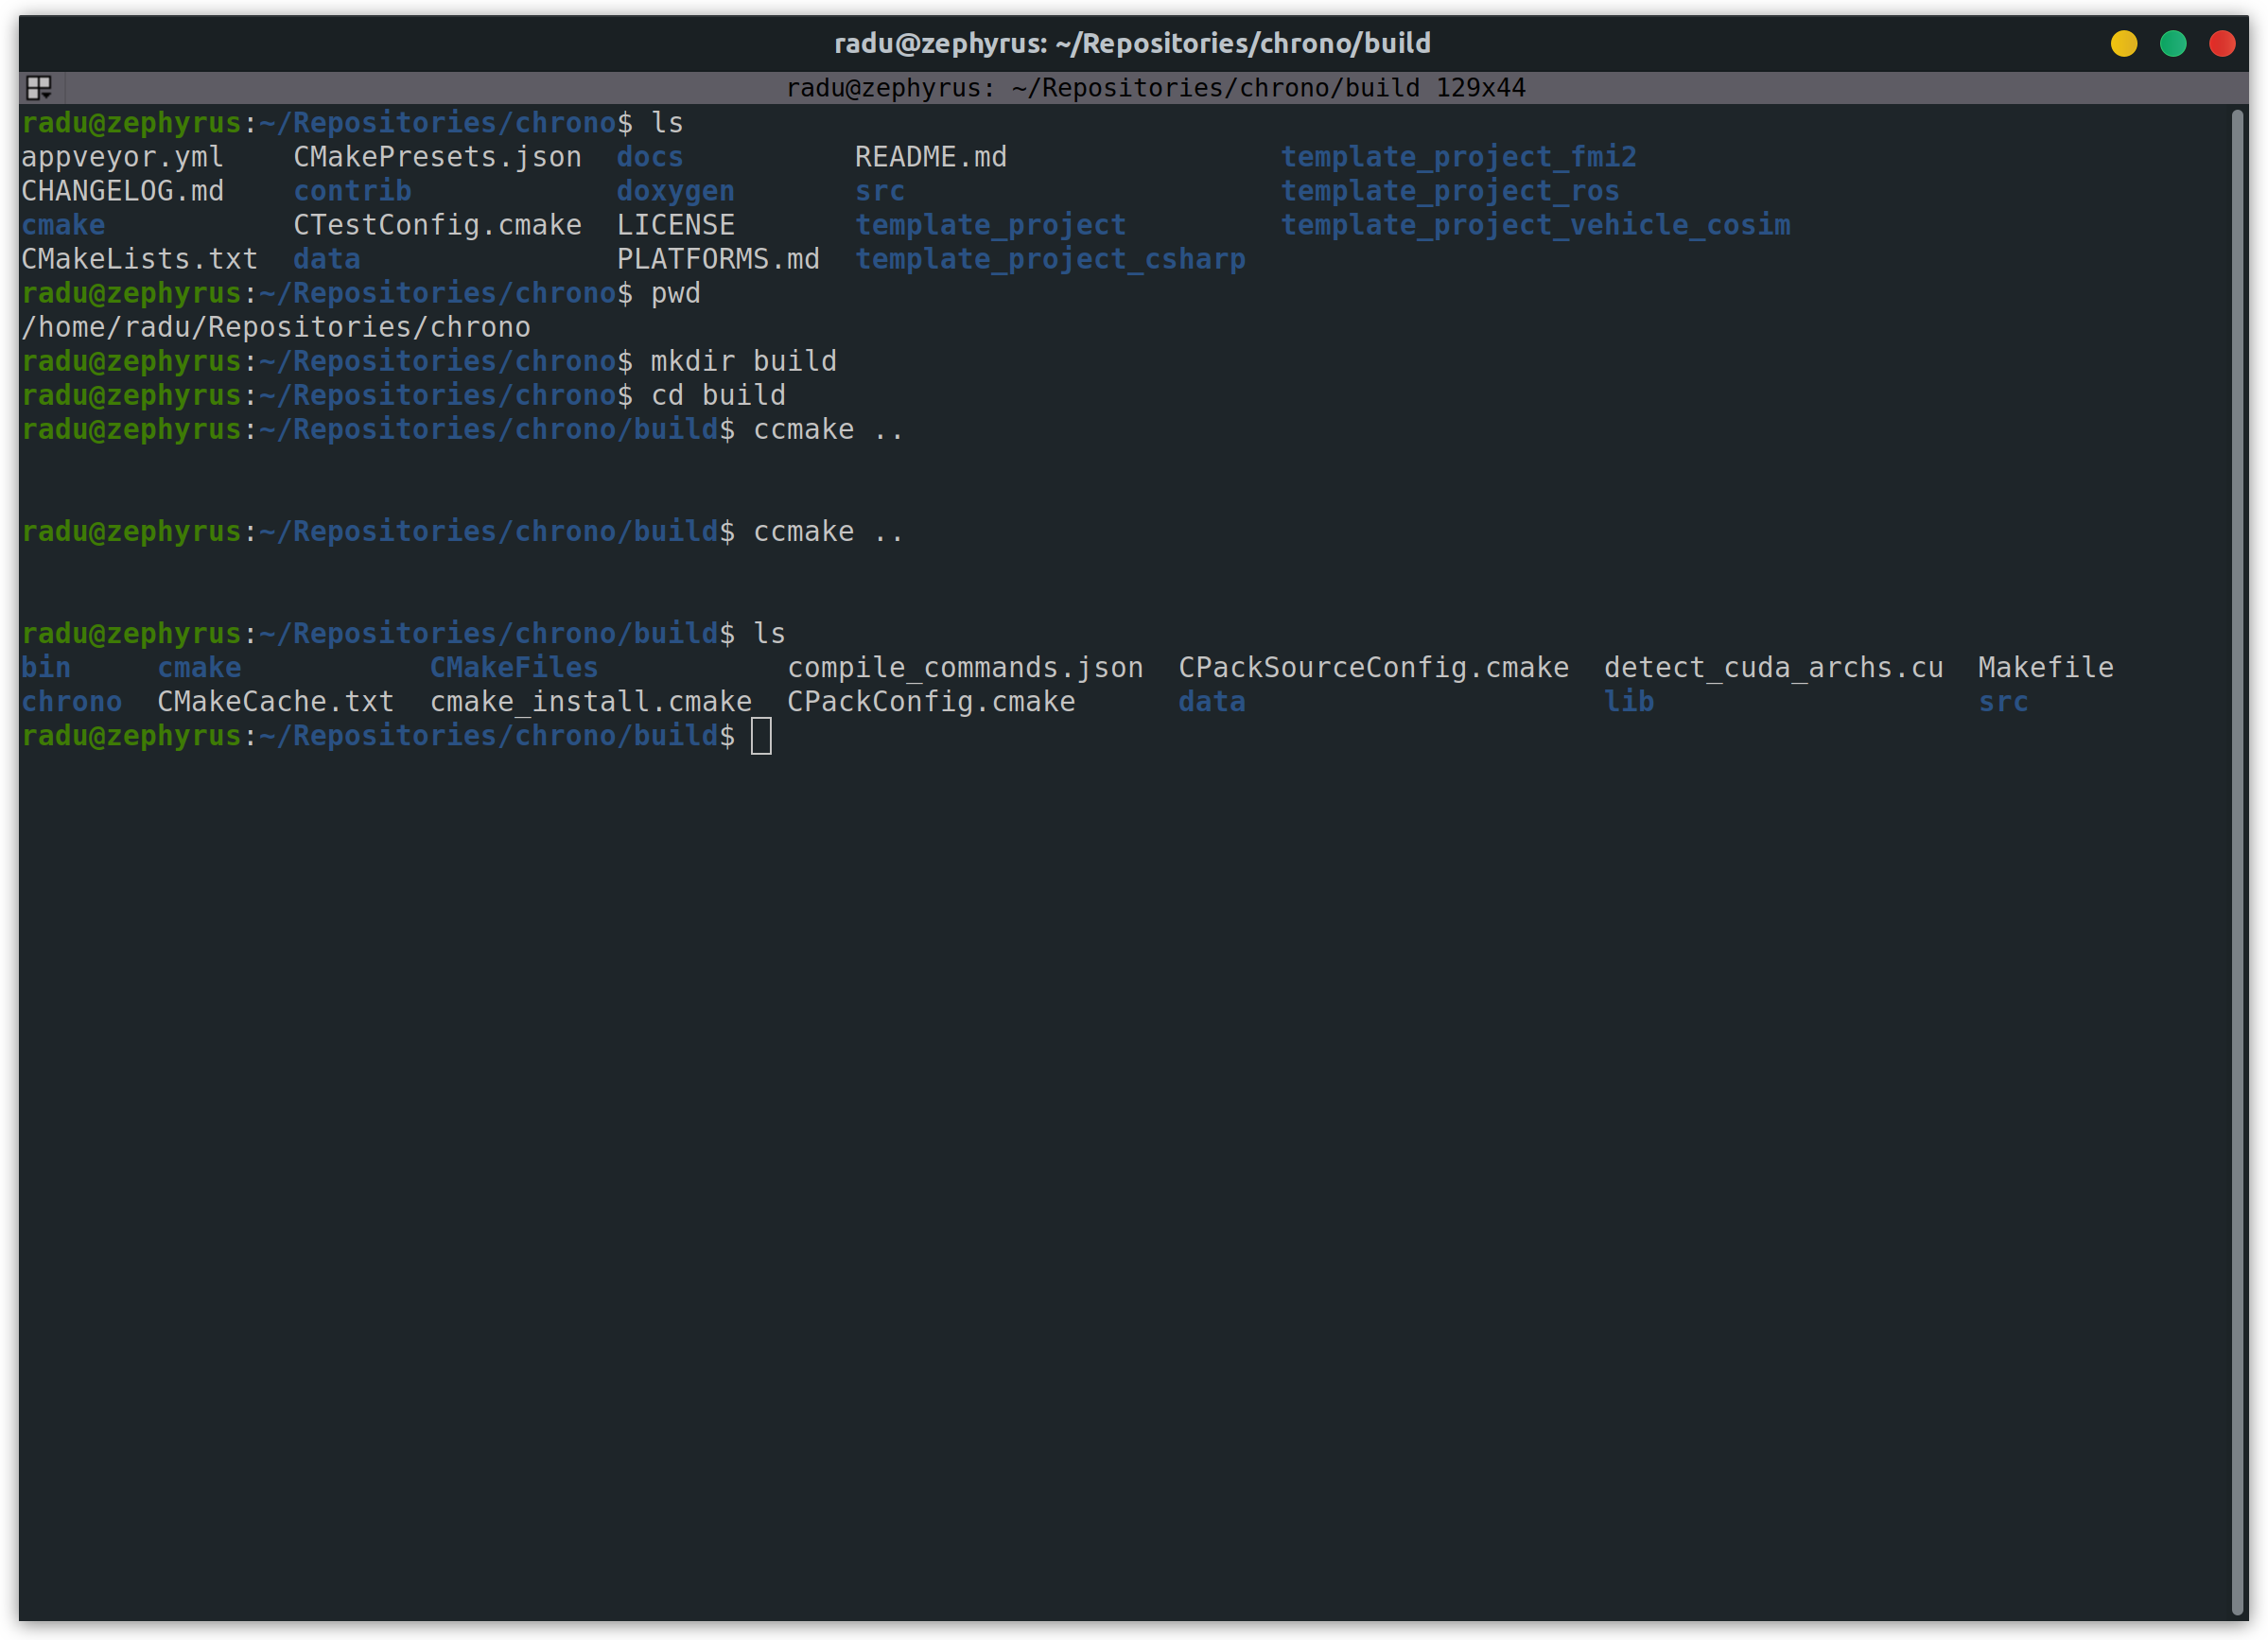
Build files are now available in the build directory (in this example, Makefile).
Building Chrono
Visual Studio
- Double-click the
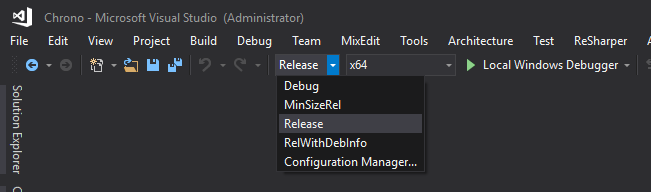
Chrono.slnfile in the build directory to open the Visual Studio solution file. Alternatively, if usingcmake-gui, click the Open Project button. - In the VS toolbar, from the Solution Configurations drop-down menu select the desired build mode (e.g., **Release*).
- In the toolbar, click on Build > Build solution or Build > Build ALL_BUILD. This will build all Chrono projects (one per Chrono module), as well as demos and tests (if enabled during configuration). By default, shared libraries (DLLs) are generated for the Chrono modules, unless
BUILD_SHAREDwas set tooffduring configuration. All DLLs and executables will be placed in a directorybin\Releaseof the build tree. - Optionally, repeat step 2 and 3, choosing Debug as configuration type, to build debug binaries which include debugging symbols. All DLLs and executables will be placed in a directory
bin\Debugof the build tree.
Linux/make
Depending on the generator used during CMake configuration, invoke the appropriate build command. For example:
make -j 10
to build with Make using 10 parallel build threads.ninja -j 10
to build with ninja using 10 parallel build threads.ninja -f build.Release.ninja -j 10
for a Release build withninjamulti-config using 10 parallel build threads.
MacOS/clang
- CMake generates a hierarchy of makefiles in the directory specified in "Where to build the binaries".
- To build the Chrono libraries and demo executables, simply invoke
makefrom the command line in that directory. - Optionally, type
make installto install the Chrono libraries, data files, and demo executables in the directory specified during CMake configuration. - CMake can be configured to generate Xcode (
cmake -G Xcode ....) configurations. You would normally use it with the Xcode IDE. The advantage is the possibility to debug the code. Like in MS Visual Studio, you choose the build type from the IDE.
libChrono_multicore successfully.However, OpenMP support can be added using homebrew:
brew install libomp. Having done so, you can then configure Chrono with OpenMP support. For this, you must define the right compiler flags: -Xpreprocessor -fopenmp for the compiler and -lomp for the linker. Please give the OpenMP options for both, the C compiler and the C++ compiler, otherwise the OpenMP configuration will fail. Testing Chrono build
The Chrono distribution includes a large number of demos, unit tests, and benchmark test. These are included in the build if the corresponding CMake variables are set to on during CMake configuration: BUILD_DEMOS, BUILD_TESTING, and BUILD_BENCHAMRKING, respectively. By default, only generation of demo executables is enabled.
Each Chrono module adds its own set of demos and tests and these are built only if the corresponding Chrono module is enabled. Note that some demo programs depend on more than one Chrono module being available. For example, most MBD and FEA demos require a run-time visualization module (VSG or Irrlicht). Similarly, Chrono::Vehicle demos require a run-time visualization module with some other vehicle demos also requiring additional modules (e.g., Chrono::FSI-SPH, Chrono::Multicore, etc.).
Executables are available under a subdirectory bin/<config>/ (e.g., bin/Release/ or bin/Debug/) for a multi-config generator or directly under bin/ otherwise.
Unit tests do not use run-time visualization and are based on googletest. Running any of the Chrono unit tests will generate a standard report, indicating whether the test succeeded or failed. You can run all unit tests at once using ctest. For example, o run all unit tests for a Release build (mult-config generator), execute the following command from the top-level build directory:
ctest -C Release
Installing Chrono
Upon a successful build, Chrono can be installed (to the directory specified during CMake configuration through the CMAKE_INSTALL_PREFIX). This will copy Chrono libraries, headers, data files, and demo executable to the install directory.
In Visual Studio, the install process is done by building the "INSTALL" project of the Chrono.sln solution.
If using make or ninja, installation is performed with:
make installninja install