A detailed install guide may be found here.
1) Check/Install a C++ compiler
Recommended compilers:
- Microsoft Visual C++: Visual Studio 2019 or newer. The community edition of the latest Visual Studio is available for free.
- Xcode Package for MacOS: Download via App Store for free - it contains the clang++ compiler.
Other compilers were also tested (e.g. Intel C++, PGI) but they are not officially supported and maintained. While it is likely possible to build Chrono with other toolchains, this might require changes to the CMake scripts.
Make sure to install the C++ toolchain during the setup!
2) Download and install the Eigen library
Chrono now uses Eigen3 for all of its internal dense linear algebra needs. Chrono requires Eigen version 3.3.0 or newer, but we strongly encourage using the latest stable release, Eigen 3.4.0. On the Mac you should install it via homebrew: brew install eigen. Homebrew installs into /opt/homebrew since MacOS 12 Monterey and the new Apple Silicon (arm46, M1, M2...) hardware. If Eigen is not found automatically, you can search its folder with:
find /opt/homebrew -name Eigen
The response is actually:
/opt/homebrew/Cellar/eigen/3.4.0_1/include/eigen3/unsupported/Eigen
/opt/homebrew/Cellar/eigen/3.4.0_1/include/eigen3/Eigen
/opt/homebrew/Cellar/eigen/3.4.0_1/include/eigen3/Eigen/Eigen
The include path is then **/opt/homebrew/Cellar/eigen/3.4.0_1/include/eigen3**.
Most Chrono modules will build and work with Eigen 3.3.0 or newer.
However, if you are building the Chrono::FSI or Chrono::Granular modules, note that CUDA 9.1 removed a header file (math_functions.hpp) which was referenced in older versions of Eigen; this issue was addressed as of Eigen 3.3.6.
3) Download the Irrlicht library
While Chrono::Irrlicht is an optional module and not required to begin modeling with Chrono, it is suggested you enable this module to get access to many Chrono demos which rely on Irrlicht for their run-time visualization.
- download Irrlicht Engine; the newest tested version is 1.8.4
- unzip it in a directory of your choice. For example, here we suppose that you unzipped it in
C:/workspace/libraries/irrlicht-1.8.4.
In such situations, we recommend either disabling use of shadows, or else installing the appropriate legacy DirectX SDK from Microsoft.
Irrlicht 1.8.4 requires the June 2010 DirectX SDK.
brew install irrlicht (release v.1.8.5). On MacOS 12 (Monterey) you have to set IRRLICHT_ROOT to /opt/homebrew.Release v.1.8.3 does not contain the precompiled 64bit DLL.
Release v.1.8.0 has issues with soft shadows.
4) Install CMake
CMake is used to manage the building process. It creates a project/solution for your specific compiler/IDE that will allow the user to compile the Chrono source code with minimal effort.
For Visual Studio users: make sure to put the CMake executable in your Path environmental variable (the installer can do this for you).
For Xcode users: the CMake.app bundle also contains command line tools, you must set appropriate links to use it from the terminal. It is better to install a pure command line version via homebrew (https://brew.sh). After installing the home brew package manager type: brew install cmake in the terminal.
5) Install a GIT client
On Windows and MacOS, you might want to download and install SourceTree.
On MacOS you will find an Application Bundle under /Applications
6) Download the project by cloning the Git repository
Download the Chrono SDK by performing a clone of the Git repository in a directory on your machine. Assuming you are using SourceTree:
- in the menu bar press File and then Clone / New button in SourceTree
- enter
https://github.com/projectchrono/chrono.gitin the field "Source Path / URL" - in the field "Destination Path" enter a path to an empty directory, say
C:/workspace/chrono
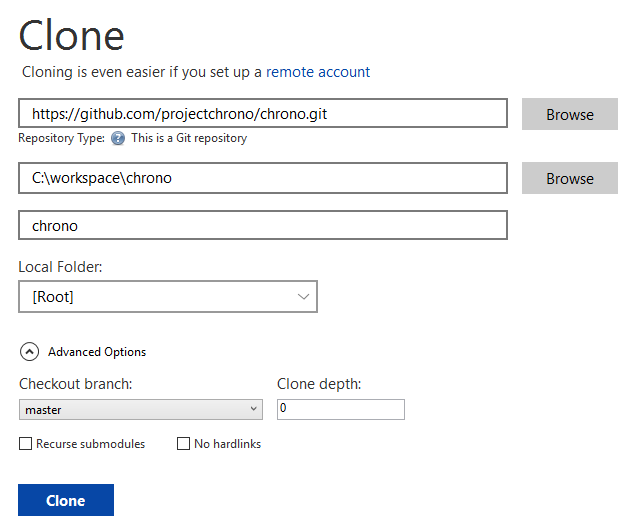
- leave the Local Folder field as it is
- under Advanced Options set Checkout branch to
master - press Clone and the source code will be downloaded into the folder you specified
master branch contains the various Chrono releases and contains the most stable code. If you are interested in using the latest features as they are developed and before the next official release, you can checkout the develop branch at any time after the initial cloning. 7) Run CMake
Start CMake to configure the build. We assume that you are using the graphical interface.
- In the field "Where is the source code" set the path to your Chrono directory.
This is the directory where you created your Git repository, in our example isC:/workspace/chrono. - In the field "Where to build the binaries" set the path to another directory on your system, that must be empty. This is where the Visual C++ project will be created.
For our example, let's useC:/workspace/chrono_build

- Press the Configure button.
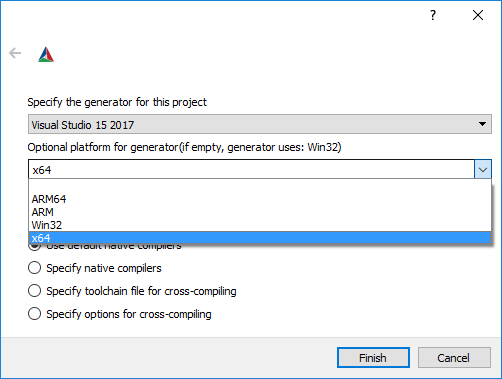
- Set the appropriate generator (e.g. Visual Studio, Makefile, etc...) and the appropriate platform (Win32, x64, etc...) i.e. if you have a 64-bit processor, as usually is, you should configure a 64-bit project.
In older CMake, there is a single list of generators in which you may choose between
e.g. 'Visual Studio 15 2017' and 'Visual Studio 15 2017 Win64' (then choose the latter).
In the latest CMake, there are separated fields, one for the generator (e.g. 'Visual Studio 15 2017') and another one for the platform (e.g. x64).
- Specify the location of the Eigen installation. If this is not detected automatically, you may need to manually set the CMake variable
EIGEN3_INCLUDE_DIR.
For example,C:/workspace/libraries/eigen-3.3.7.
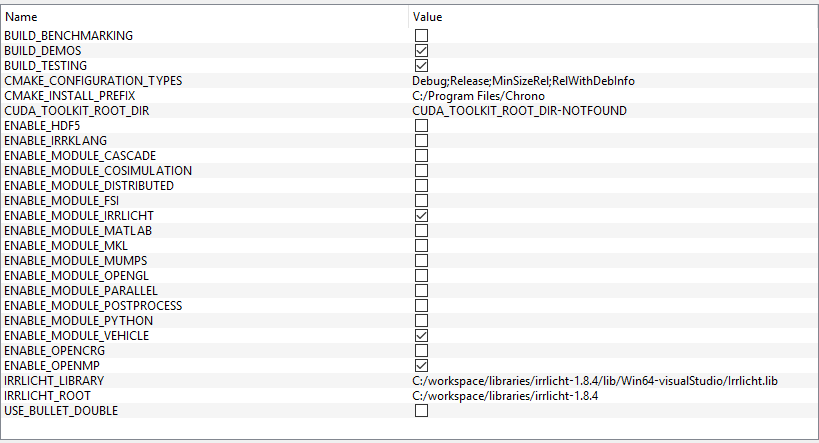
- Change the settings in the user interface of CMake. Some of these settings are automatically detected, but some other must be changed.
- Enable the recommended optional modules: at least tick
ENABLE_MODULE_IRRLICHTandENABLE_MODULE_POSTPROCESS.
Other modules might require additional settings and dependencies. - Press Configure.
- Set the
IRRLICHT_ROOTvariable: it must contain the path to the directory where you unzipped Irrlicht.
In our example, browse toC:/workspace/libraries/irrlicht-1.8.4 - Press Configure again.
- The
IRRLICHT_LIBRARYvariable should be filled automatically. If not, select (for Win users):C:/workspace/libraries/irrlicht-1.8.4/lib/Win64-visualStudio/Irrlicht.lib.
Then press Configure again.
- Enable the recommended optional modules: at least tick
- Remember that you might need to press Configure after you change some setting, even multiple times, until all the variables get a white background.
- Finally, press Generate.
CMAKE_CONFIGURATION_TYPES variable untouched (it should report Debug;Release;MinSizeRel;RelWithDebInfo; if not, please do File>*Delete Cache* and start again the CMake configuration).The build configuration will be chosen directly from Visual Studio. For Makefile-based solutions, on the contrary, you should set
CMAKE_CONFIGURATION_TYPES to either Debug or Release (or MinSizeRel or RelWithDebInfo). Makefile does not support multiple configuration types. / character for paths. Unix users are already used to this convention.Windows users should take care to convert the backslash
\ (the default in Win OS) to slash /! At this point you just created a project that will be later used to build Chrono. You can close CMake.
8) Compile the project
For Visual Studio:
- Go to the directory that you set in "Where to build the binaries". You will find the file Chrono.sln.
- Double-click on that file: your Visual Studio solution will open.
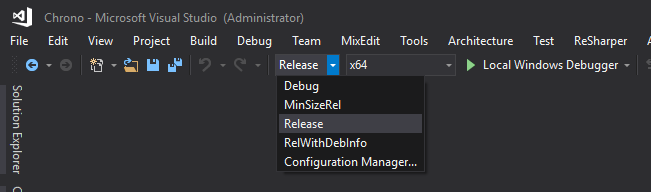
- In the toolbar, from the Solution Configurations drop-down menu choose 'Release' mode
- In the toolbar, click on Build > Build solution... .
The entire Chrono project and its demos will be compiled, creating many .exe and .dll files, in the bin/Release subdirectory.
This will take a few minutes. - Repeat step 3 and 4, but choosing Debug as configuration type. This will generate the binaries with debugging symbols: they will be placed under the bin/Debug subfolder.
For MacOS/clang:
- CMake generates a hierarchy of makefiles in the directory specified in "Where to build the binaries".
- To build the Chrono libraries and demo executables, simply invoke
makefrom the command line in that directory. - Optionally, type
make installto install the Chrono libraries, data files, and demo executables in the directory specified during CMake configuration. - CMake can be configured to generate Xcode (
cmake -G Xcode ....) configurations. You would normally use it with the Xcode IDE. The advantage is the possibilty to debug the code. Like in MS Visual Studio, you choose the build type from the IDE.
libChronoEngine_multicore successfully.However, OpenMP support can be added using homebrew:
brew install libomp. Having done so, you can then configure Chrono with OpenMP support. For this, you must define the right compiler flags:-Xpreprocessor -fopenmp for the compiler and -lomp for the linker. Please give the OpenMP options for both, the C compiler and the C++ compiler, otherwise the OpenMP configuration will fail. 9) Test the demos
Go to the directory that you set in "Where to build the binaries", in our case C:/workspace/chrono_build, then go to bin/Release or bin/Debug (Windows).
You have to manually copy the Irrlicht.dll from your Irrlicht
/bin/Win64-visualStudio directory into your chrono_build/bin/Debug and/or chrono_build/bin/Release directory.