Export POVray animations (demo_POST_povray.cpp)

Tutorial that teaches how to use the POSTPROCESS module to create animations with POVray.

When the simulation is run, a set of .pov and .ini files are saved on disk, so that one can use POVray later to do high-quality rendering of simulations.

  • Learn how to attach chrono::ChAsset shapes to rigid bodies.
  • Learn how to output data for POVray.

Note: the same assets can be used to render animations in real-time in the interactive 3D view of Irrlicht, as explained in demo_IRR_assets.cpp

Example 1

Create a chrono::ChBody, and attach some 'assets' that define 3D shapes. These shapes can be shown by Irrlicht or POV postprocessing, etc... Note: these assets are independent from collision shapes!

// Create a ChBody, and attach some 'assets'
// that define 3D shapes. These shapes can be shown
// by Irrlicht or POV postprocessing, etc...
// Note: these assets are independent from collision shapes!
// Create a rigid body as usual, and add it
// to the physical system:
auto mfloor = chrono_types::make_shared<ChBody>();
mfloor->SetBodyFixed(true);
// Define a collision shape
auto floor_mat = chrono_types::make_shared<ChMaterialSurfaceNSC>();
mfloor->GetCollisionModel()->ClearModel();
mfloor->GetCollisionModel()->AddBox(floor_mat, 10, 0.5, 10, ChVector<>(0, -1, 0));
mfloor->GetCollisionModel()->BuildModel();
mfloor->SetCollide(true);
// Add body to system
mphysicalSystem.Add(mfloor);
// ==Asset== attach a 'box' shape.
// Note that assets are managed via shared pointer, so they
// can also be shared). Do not forget AddAsset() at the end!
auto mboxfloor = chrono_types::make_shared<ChBoxShape>();
mboxfloor->GetBoxGeometry().Pos = ChVector<>(0, -1, 0);
mboxfloor->GetBoxGeometry().Size = ChVector<>(10, 0.5, 10);
mfloor->AddAsset(mboxfloor);
// ==Asset== attach color asset.
auto mfloorcolor = chrono_types::make_shared<ChColorAsset>();
mfloorcolor->SetColor(ChColor(0.3f, 0.3f, 0.6f));
mfloor->AddAsset(mfloorcolor);

Example 2

Textures, colors, asset levels with transformations. This section shows how to add more advanced types of assets and how to group assets in chrono::ChAssetLevel containers.

// Textures, colors, asset levels with transformations.
// This section shows how to add more advanced types of assets
// and how to group assets in ChAssetLevel containers.
// Create the rigid body as usual (this won't move,
// it is only for visualization tests)
auto mbody = chrono_types::make_shared<ChBody>();
mbody->SetBodyFixed(true);
mphysicalSystem.Add(mbody);
// ==Asset== Attach a 'sphere' shape
auto msphere = chrono_types::make_shared<ChSphereShape>();
msphere->GetSphereGeometry().rad = 0.5;
msphere->GetSphereGeometry().center = ChVector<>(-1, 0, 0);
mbody->AddAsset(msphere);
// ==Asset== Attach also a 'box' shape
auto mbox = chrono_types::make_shared<ChBoxShape>();
mbox->GetBoxGeometry().Pos = ChVector<>(1, 0, 0);
mbox->GetBoxGeometry().Size = ChVector<>(0.2, 0.5, 0.1);
mbody->AddAsset(mbox);
// ==Asset== Attach also a 'cylinder' shape
auto mcyl = chrono_types::make_shared<ChCylinderShape>();
mcyl->GetCylinderGeometry().p1 = ChVector<>(2, -0.2, 0);
mcyl->GetCylinderGeometry().p2 = ChVector<>(2.2, 0.5, 0);
mcyl->GetCylinderGeometry().rad = 0.3;
mbody->AddAsset(mcyl);
// ==Asset== Attach color. To set colors for all assets
// in the same level, just add this:
auto mvisual = chrono_types::make_shared<ChColorAsset>();
mvisual->SetColor(ChColor(0.9f, 0.4f, 0.2f));
mbody->AddAsset(mvisual);
// ==Asset== Attach a level that contains other assets.
// Note: a ChAssetLevel can define a rotation/translation respect to paren level,
// Note: a ChAssetLevel can contain colors or textures: if any, they affect only objects in the level.
auto mlevelA = chrono_types::make_shared<ChAssetLevel>();
// ==Asset== Attach, in this level, a 'Wavefront mesh' asset,
// referencing a .obj file:
auto mobjmesh = chrono_types::make_shared<ChObjShapeFile>();
mobjmesh->SetFilename(GetChronoDataFile("models/forklift/body.obj"));
mlevelA->AddAsset(mobjmesh);
// ==Asset== Attach also a texture, that will affect only the
// assets in mlevelA.
// NOTE: the path to texture is the path relative to this .exe,
// as when you are using the Irrlicht visualization.
auto mtexture = chrono_types::make_shared<ChTexture>();
mtexture->SetTextureFilename(GetChronoDataFile("textures/bluewhite.png"));
mlevelA->AddAsset(mtexture);
// Change the position of mlevelA, thus moving also its sub-assets:
mlevelA->GetFrame().SetPos(ChVector<>(0, 0, 2));
mbody->AddAsset(mlevelA);
// ==Asset== Attach sub level, then add to it an array of sub-levels,
// each rotated, and each containing a displaced box, thus making a
// spiral of cubes
auto mlevelB = chrono_types::make_shared<ChAssetLevel>();
for (int j = 0; j < 20; j++) {
// ==Asset== the sub sub level..
auto mlevelC = chrono_types::make_shared<ChAssetLevel>();
// ==Asset== the contained box..
auto msmallbox = chrono_types::make_shared<ChBoxShape>();
msmallbox->GetBoxGeometry().Pos = ChVector<>(0.4, 0, 0);
msmallbox->GetBoxGeometry().Size = ChVector<>(0.1, 0.1, 0.01);
mlevelC->AddAsset(msmallbox);
ChQuaternion<> mrot;
mrot.Q_from_AngAxis(j * 21 * CH_C_DEG_TO_RAD, ChVector<>(0, 1, 0));
mlevelC->GetFrame().SetRot(mrot);
mlevelC->GetFrame().SetPos(ChVector<>(0, j * 0.02, 0));
mlevelB->AddAsset(mlevelC);
}
mbody->AddAsset(mlevelB);
// ==Asset== Attach a video camera. This will be used by Irrlicht,
// or POVray postprocessing, etc. Note that a camera can also be
// put in a moving object.
auto mcamera = chrono_types::make_shared<ChCamera>();
mcamera->SetAngle(50);
mcamera->SetPosition(ChVector<>(-3, 4, -5));
mcamera->SetAimPoint(ChVector<>(0, 1, 0));
mbody->AddAsset(mcamera);

Example 3

Create a chrono::ChParticlesClones cluster, and attach 'assets' that define a single "sample" 3D shape. This will be shown N times in POV or Irrlicht.

// Create a ChParticleClones cluster, and attach 'assets'
// that define a single "sample" 3D shape. This will be shown
// N times in Irrlicht.
// Create the ChParticleClones, populate it with some random particles,
// and add it to physical system:
auto mparticles = chrono_types::make_shared<ChParticlesClones>();
// Note: coll. shape, if needed, must be specified before creating particles
auto particle_mat = chrono_types::make_shared<ChMaterialSurfaceNSC>();
mparticles->GetCollisionModel()->ClearModel();
mparticles->GetCollisionModel()->AddSphere(particle_mat, 0.05);
mparticles->GetCollisionModel()->BuildModel();
mparticles->SetCollide(true);
// Create the random particles
for (int np = 0; np < 100; ++np)
mparticles->AddParticle(ChCoordsys<>(ChVector<>(ChRandom() - 2, 1, ChRandom() - 0.5)));
// Do not forget to add the particle cluster to the system:
mphysicalSystem.Add(mparticles);
// ==Asset== Attach a 'sphere' shape asset.. it will be used as a sample
// shape to display all particles when rendering in 3D!
auto mspherepart = chrono_types::make_shared<ChSphereShape>();
mspherepart->GetSphereGeometry().rad = 0.05;
mparticles->AddAsset(mspherepart);

The POV exporter

The following part is very important because this is what makes this demo different from the demo_IRR_assets, that used Irrlicht. We need to create a postprocessor of type chrono::postprocess::ChPovRay and tell him that we are going to export our visualization assets:

//
// SETUP THE POSTPROCESSING
//
// Create an exporter to POVray !!!
ChPovRay pov_exporter = ChPovRay(&mphysicalSystem);
// Important: set the path to the template:
pov_exporter.SetTemplateFile(GetChronoDataFile("_template_POV.pov"));
// Set the path where it will save all .pov, .ini, .asset and .dat files, a directory will be created if not existing
pov_exporter.SetBasePath(GetChronoOutputPath() + "DEMO_POVRAY");
// Optional: change the default naming of the generated files:
//pov_exporter.SetOutputScriptFile("rendering_frames.pov");
//pov_exporter.SetOutputDataFilebase("my_state");
//pov_exporter.SetPictureFilebase("picture");
// --Optional: modify default light
pov_exporter.SetLight(ChVector<>(-3, 4, 2), ChColor(0.15f, 0.15f, 0.12f), false);
// --Optional: add further POV commands, for example in this case:
// create an area light for soft shadows
// create a Grid object; Grid() parameters: step, linewidth, linecolor, planecolor
// Remember to use \ at the end of each line for a multiple-line string.
pov_exporter.SetCustomPOVcommandsScript(
" \
light_source { \
<2, 10, -3> \
color rgb<1.2,1.2,1.2> \
area_light <4, 0, 0>, <0, 0, 4>, 8, 8 \
adaptive 1 \
jitter\
} \
object{ Grid(1,0.02, rgb<0.7,0.8,0.8>, rgbt<1,1,1,1>) rotate <0, 0, 90> } \
");
// --Optional: attach additional custom POV commands to some of the rigid bodies,
// using the ChPovRayAssetCustom asset. This asset for example projects a
// checkered texture to the floor. This POV specific asset won't be rendered
// by Irrlicht or other interfaces.
auto mPOVcustom = chrono_types::make_shared<ChPovRayAssetCustom>();
mPOVcustom->SetCommands((char*)"pigment { checker rgb<0.9,0.9,0.9>, rgb<0.75,0.8,0.8> }");
mfloor->AddAsset(mPOVcustom);
// IMPORTANT! Tell to the POVray exporter that
// he must take care of converting the shapes of
// all items!
pov_exporter.AddAll();
// (Optional: tell selectively which physical items you
// want to render in the folllowing way...)
// pov_exporter.RemoveAll();
// pov_exporter.Add(mfloor);
// pov_exporter.Add(mbody);
// pov_exporter.Add(mparticles);

The simulation loop

Now you have to write the usual while() loop to perform the simulation. Note that before running the loop you need to use pov_exporter.ExportScript(); , and for each timestep you must use pov_exporter.ExportData(); actually this is the instruction that creates the many .dat and .pov files in the output directory.

//
// RUN THE SIMULATION AND SAVE THE POVray FILES AT EACH FRAME
//
// 1) Create the two .pov and .ini files for POV-Ray (this must be done
// only once at the beginning of the simulation).
pov_exporter.ExportScript();
while (mphysicalSystem.GetChTime() < 1.5) {
mphysicalSystem.DoStepDynamics(0.01);
GetLog() << "time= " << mphysicalSystem.GetChTime() << "\n";
// 2) Create the incremental nnnn.dat and nnnn.pov files that will be load
// by the pov .ini script in POV-Ray (do this at each simulation timestep)
pov_exporter.ExportData();
}
// That's all! If all worked ok, this python script should
// have created a "rendering_frames.pov.ini" file that you can
// load in POV-Ray, then when you press 'RUN' you will see that
// POV-Ray will start rendering a short animation, saving the frames
// in the directory 'anim'.

Executing and rendering with POVray

Once you created your program, compile it, then:

  • execute the demo_POST_povray.exe
  • on the console you will see a time counter showing that the system is load and it is being simulated
  • when the program ends, you must open POVray and open the rendering_frames.pov.ini file, using the Open menu or button, or drag&drop (you can find this .ini file and other POVray as they are saved in the same directory of the executable)

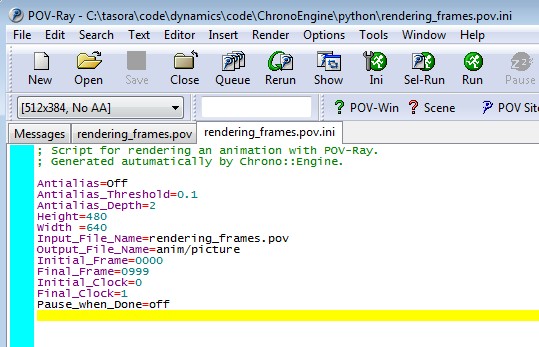
  • press the Run button in POVray to execute the .ini file , and you should see that POVray generates lot of frames, being saved in the directory anim.

Optional encoding into an AVI or MPEG animation

If you want to generate a .mpeg or .avi animation from the rendered .bmp images, we suggest to use the VirtualDub tool:

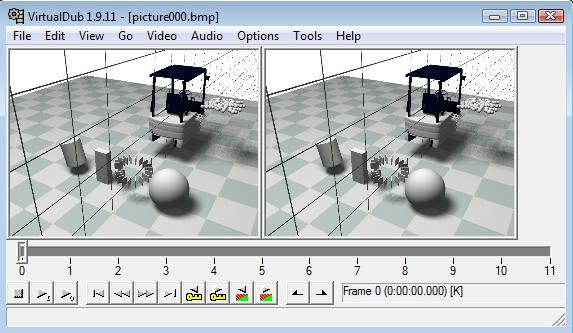
  • drag&drop the first .jpg frame in its interface; it will automatically load all other frames in the timeline
  • use menu Video/Compression... to setup the proper video codec (suggested: Xvid, DivX, mpeg4, etc.)
  • use menu File/Save As Avi... to encode and save the animation on disk.

Listing

In the following we report the entire source code for reference.

// =============================================================================
// PROJECT CHRONO - http://projectchrono.org
//
// Copyright (c) 2014 projectchrono.org
// All rights reserved.
//
// Use of this source code is governed by a BSD-style license that can be found
// in the LICENSE file at the top level of the distribution and at
// http://projectchrono.org/license-chrono.txt.
//
// =============================================================================
// Authors: Alessandro Tasora
// =============================================================================
//
// Demo code about using the assets system to create shapes that can be shown in
// the 3D postprocessing, by using POVray.
//
// =============================================================================
#include "chrono/assets/ChAssetLevel.h"
#include "chrono/assets/ChBoxShape.h"
#include "chrono/assets/ChCamera.h"
#include "chrono/assets/ChColorAsset.h"
#include "chrono/assets/ChCylinderShape.h"
#include "chrono/assets/ChObjShapeFile.h"
#include "chrono/assets/ChSphereShape.h"
#include "chrono/assets/ChTexture.h"
#include "chrono/physics/ChParticlesClones.h"
#include "chrono/physics/ChSystemNSC.h"
#include "chrono_postprocess/ChPovRay.h"
#include "chrono_postprocess/ChPovRayAssetCustom.h"
#include "chrono_thirdparty/filesystem/path.h"
using namespace chrono;
using namespace postprocess;
int main(int argc, char* argv[]) {
GetLog() << "Copyright (c) 2017 projectchrono.org\nChrono version: " << CHRONO_VERSION << "\n\n";
// Create a Chrono::Engine physical system
ChSystemNSC mphysicalSystem;
/* Start example */
// Create a ChBody, and attach some 'assets'
// that define 3D shapes. These shapes can be shown
// by Irrlicht or POV postprocessing, etc...
// Note: these assets are independent from collision shapes!
// Create a rigid body as usual, and add it
// to the physical system:
auto mfloor = chrono_types::make_shared<ChBody>();
mfloor->SetBodyFixed(true);
// Define a collision shape
auto floor_mat = chrono_types::make_shared<ChMaterialSurfaceNSC>();
mfloor->GetCollisionModel()->ClearModel();
mfloor->GetCollisionModel()->AddBox(floor_mat, 10, 0.5, 10, ChVector<>(0, -1, 0));
mfloor->GetCollisionModel()->BuildModel();
mfloor->SetCollide(true);
// Add body to system
mphysicalSystem.Add(mfloor);
// ==Asset== attach a 'box' shape.
// Note that assets are managed via shared pointer, so they
// can also be shared). Do not forget AddAsset() at the end!
auto mboxfloor = chrono_types::make_shared<ChBoxShape>();
mboxfloor->GetBoxGeometry().Pos = ChVector<>(0, -1, 0);
mboxfloor->GetBoxGeometry().Size = ChVector<>(10, 0.5, 10);
mfloor->AddAsset(mboxfloor);
// ==Asset== attach color asset.
auto mfloorcolor = chrono_types::make_shared<ChColorAsset>();
mfloorcolor->SetColor(ChColor(0.3f, 0.3f, 0.6f));
mfloor->AddAsset(mfloorcolor);
/* End example */
/* Start example */
// Textures, colors, asset levels with transformations.
// This section shows how to add more advanced types of assets
// and how to group assets in ChAssetLevel containers.
// Create the rigid body as usual (this won't move,
// it is only for visualization tests)
auto mbody = chrono_types::make_shared<ChBody>();
mbody->SetBodyFixed(true);
mphysicalSystem.Add(mbody);
// ==Asset== Attach a 'sphere' shape
auto msphere = chrono_types::make_shared<ChSphereShape>();
msphere->GetSphereGeometry().rad = 0.5;
msphere->GetSphereGeometry().center = ChVector<>(-1, 0, 0);
mbody->AddAsset(msphere);
// ==Asset== Attach also a 'box' shape
auto mbox = chrono_types::make_shared<ChBoxShape>();
mbox->GetBoxGeometry().Pos = ChVector<>(1, 0, 0);
mbox->GetBoxGeometry().Size = ChVector<>(0.2, 0.5, 0.1);
mbody->AddAsset(mbox);
// ==Asset== Attach also a 'cylinder' shape
auto mcyl = chrono_types::make_shared<ChCylinderShape>();
mcyl->GetCylinderGeometry().p1 = ChVector<>(2, -0.2, 0);
mcyl->GetCylinderGeometry().p2 = ChVector<>(2.2, 0.5, 0);
mcyl->GetCylinderGeometry().rad = 0.3;
mbody->AddAsset(mcyl);
// ==Asset== Attach color. To set colors for all assets
// in the same level, just add this:
auto mvisual = chrono_types::make_shared<ChColorAsset>();
mvisual->SetColor(ChColor(0.9f, 0.4f, 0.2f));
mbody->AddAsset(mvisual);
// ==Asset== Attach a level that contains other assets.
// Note: a ChAssetLevel can define a rotation/translation respect to paren level,
// Note: a ChAssetLevel can contain colors or textures: if any, they affect only objects in the level.
auto mlevelA = chrono_types::make_shared<ChAssetLevel>();
// ==Asset== Attach, in this level, a 'Wavefront mesh' asset,
// referencing a .obj file:
auto mobjmesh = chrono_types::make_shared<ChObjShapeFile>();
mobjmesh->SetFilename(GetChronoDataFile("models/forklift/body.obj"));
mlevelA->AddAsset(mobjmesh);
// ==Asset== Attach also a texture, that will affect only the
// assets in mlevelA.
// NOTE: the path to texture is the path relative to this .exe,
// as when you are using the Irrlicht visualization.
auto mtexture = chrono_types::make_shared<ChTexture>();
mtexture->SetTextureFilename(GetChronoDataFile("textures/bluewhite.png"));
mlevelA->AddAsset(mtexture);
// Change the position of mlevelA, thus moving also its sub-assets:
mlevelA->GetFrame().SetPos(ChVector<>(0, 0, 2));
mbody->AddAsset(mlevelA);
// ==Asset== Attach sub level, then add to it an array of sub-levels,
// each rotated, and each containing a displaced box, thus making a
// spiral of cubes
auto mlevelB = chrono_types::make_shared<ChAssetLevel>();
for (int j = 0; j < 20; j++) {
// ==Asset== the sub sub level..
auto mlevelC = chrono_types::make_shared<ChAssetLevel>();
// ==Asset== the contained box..
auto msmallbox = chrono_types::make_shared<ChBoxShape>();
msmallbox->GetBoxGeometry().Pos = ChVector<>(0.4, 0, 0);
msmallbox->GetBoxGeometry().Size = ChVector<>(0.1, 0.1, 0.01);
mlevelC->AddAsset(msmallbox);
mrot.Q_from_AngAxis(j * 21 * CH_C_DEG_TO_RAD, ChVector<>(0, 1, 0));
mlevelC->GetFrame().SetRot(mrot);
mlevelC->GetFrame().SetPos(ChVector<>(0, j * 0.02, 0));
mlevelB->AddAsset(mlevelC);
}
mbody->AddAsset(mlevelB);
// ==Asset== Attach a video camera. This will be used by Irrlicht,
// or POVray postprocessing, etc. Note that a camera can also be
// put in a moving object.
auto mcamera = chrono_types::make_shared<ChCamera>();
mcamera->SetAngle(50);
mcamera->SetPosition(ChVector<>(-3, 4, -5));
mcamera->SetAimPoint(ChVector<>(0, 1, 0));
mbody->AddAsset(mcamera);
/* End example */
/* Start example */
// Create a ChParticleClones cluster, and attach 'assets'
// that define a single "sample" 3D shape. This will be shown
// N times in Irrlicht.
// Create the ChParticleClones, populate it with some random particles,
// and add it to physical system:
auto mparticles = chrono_types::make_shared<ChParticlesClones>();
// Note: coll. shape, if needed, must be specified before creating particles
auto particle_mat = chrono_types::make_shared<ChMaterialSurfaceNSC>();
mparticles->GetCollisionModel()->ClearModel();
mparticles->GetCollisionModel()->AddSphere(particle_mat, 0.05);
mparticles->GetCollisionModel()->BuildModel();
mparticles->SetCollide(true);
// Create the random particles
for (int np = 0; np < 100; ++np)
mparticles->AddParticle(ChCoordsys<>(ChVector<>(ChRandom() - 2, 1, ChRandom() - 0.5)));
// Do not forget to add the particle cluster to the system:
mphysicalSystem.Add(mparticles);
// ==Asset== Attach a 'sphere' shape asset.. it will be used as a sample
// shape to display all particles when rendering in 3D!
auto mspherepart = chrono_types::make_shared<ChSphereShape>();
mspherepart->GetSphereGeometry().rad = 0.05;
mparticles->AddAsset(mspherepart);
/* End example */
/* Start example */
//
// SETUP THE POSTPROCESSING
//
// Create an exporter to POVray !!!
ChPovRay pov_exporter = ChPovRay(&mphysicalSystem);
// Important: set the path to the template:
pov_exporter.SetTemplateFile(GetChronoDataFile("_template_POV.pov"));
// Set the path where it will save all .pov, .ini, .asset and .dat files, a directory will be created if not existing
pov_exporter.SetBasePath(GetChronoOutputPath() + "DEMO_POVRAY");
// Optional: change the default naming of the generated files:
//pov_exporter.SetOutputScriptFile("rendering_frames.pov");
//pov_exporter.SetOutputDataFilebase("my_state");
//pov_exporter.SetPictureFilebase("picture");
// --Optional: modify default light
pov_exporter.SetLight(ChVector<>(-3, 4, 2), ChColor(0.15f, 0.15f, 0.12f), false);
// --Optional: add further POV commands, for example in this case:
// create an area light for soft shadows
// create a Grid object; Grid() parameters: step, linewidth, linecolor, planecolor
// Remember to use \ at the end of each line for a multiple-line string.
pov_exporter.SetCustomPOVcommandsScript(
" \
light_source { \
<2, 10, -3> \
color rgb<1.2,1.2,1.2> \
area_light <4, 0, 0>, <0, 0, 4>, 8, 8 \
adaptive 1 \
jitter\
} \
object{ Grid(1,0.02, rgb<0.7,0.8,0.8>, rgbt<1,1,1,1>) rotate <0, 0, 90> } \
");
// --Optional: attach additional custom POV commands to some of the rigid bodies,
// using the ChPovRayAssetCustom asset. This asset for example projects a
// checkered texture to the floor. This POV specific asset won't be rendered
// by Irrlicht or other interfaces.
auto mPOVcustom = chrono_types::make_shared<ChPovRayAssetCustom>();
mPOVcustom->SetCommands((char*)"pigment { checker rgb<0.9,0.9,0.9>, rgb<0.75,0.8,0.8> }");
mfloor->AddAsset(mPOVcustom);
// IMPORTANT! Tell to the POVray exporter that
// he must take care of converting the shapes of
// all items!
pov_exporter.AddAll();
// (Optional: tell selectively which physical items you
// want to render in the folllowing way...)
// pov_exporter.RemoveAll();
// pov_exporter.Add(mfloor);
// pov_exporter.Add(mbody);
// pov_exporter.Add(mparticles);
/* End example */
/* Start example */
//
// RUN THE SIMULATION AND SAVE THE POVray FILES AT EACH FRAME
//
// 1) Create the two .pov and .ini files for POV-Ray (this must be done
// only once at the beginning of the simulation).
pov_exporter.ExportScript();
while (mphysicalSystem.GetChTime() < 1.5) {
mphysicalSystem.DoStepDynamics(0.01);
GetLog() << "time= " << mphysicalSystem.GetChTime() << "\n";
// 2) Create the incremental nnnn.dat and nnnn.pov files that will be load
// by the pov .ini script in POV-Ray (do this at each simulation timestep)
pov_exporter.ExportData();
}
// That's all! If all worked ok, this python script should
// have created a "rendering_frames.pov.ini" file that you can
// load in POV-Ray, then when you press 'RUN' you will see that
// POV-Ray will start rendering a short animation, saving the frames
// in the directory 'anim'.
/* End example */
return 0;
}
std::string GetChronoDataFile(const std::string &filename)
Obtain the complete path to the specified filename, given relative to the Chrono data directory (thre...
Definition: ChGlobal.cpp:95
void Add(std::shared_ptr< ChPhysicsItem > item)
Attach an arbitrary ChPhysicsItem (e.g.
Definition: ChSystem.cpp:170
COORDSYS:
Definition: ChCoordsys.h:38
ChLog & GetLog()
Global function to get the current ChLog object.
Definition: ChLog.cpp:39
Class for setting a color (used by ChVisualization)
Definition: ChColor.h:25
Definition of general purpose 3d vector variables, such as points in 3D.
Definition: ChVector.h:35
const std::string & GetChronoOutputPath()
Obtain the path to the output directory for Chrono demos.
Definition: ChGlobal.cpp:110
int DoStepDynamics(double step_size)
Advances the dynamical simulation for a single step, of length step_size.
Definition: ChSystem.cpp:1381
double ChRandom()
Returns random value in (0..1) interval with Park-Miller method.
Definition: ChMathematics.cpp:53
Class defining quaternion objects, that is four-dimensional numbers, also known as Euler parameters.
Definition: ChQuaternion.h:45
Main namespace for the Chrono package.
Definition: ChAsset.cpp:18
double GetChTime() const
Get the simulation time of this system.
Definition: ChSystem.h:230
void Q_from_AngAxis(Real angle, const ChVector< Real > &axis)
Set the quaternion from an angle of rotation and an axis, defined in absolute coords.
Definition: ChQuaternion.h:1129
Class for a physical system in which contact is modeled using a non-smooth (complementarity-based) me...
Definition: ChSystemNSC.h:29